Personal Virtual Machine✯
Overview✯
All students and faculty members have two personal Linux virtual machines configured with the same software as the classroom machines or educational servers.
vm-<uca-account>.local.isima.frUsage: clone of a teaching machine (same distribution, same software) with shared mounted and graphical accesssrv-<uca-account>.local.isima.frUsage: clean Debian with only the shared mounted, no graphical access (SSH only)
In concrete terms, these are not exactly VMs but LXC containers
Specifications✯
Virtual machine vm-
Virtual machine srv-
- fqdn:
srv-<uca-account>.local.isima.fr - OS: debian
- Desktop: None
- RAM: 8 GB
- cores: 4
- Disk: 50 GB
Warnings!✯
Attention: You must regularly back up your work!
The virtual machine may be deleted without notice.
The ONLY DATA BACKED UP are those stored in your ~/shared directory.
The ~/shared folder is not a working folder.
- You must work locally
- Then save your data in
~/shared
Warning
If many users create a VM at the same time (e.g., within a 5-second interval), VM creation may be impacted for some of them.
We are currently working on fixing this issue by attempting to integrate a queue into our creation process.
If you encounter a problem (your VM appears created but is inaccessible), destroy your VM and recreate it
Building Your VM✯
For students, this operation should be unnecessary at the beginning. VMs should already be built and ready to start
After logging in to My, go to the VMs section  .
.
If you have no VMs, you should see the following screen; click the (+) button to create your VM
Wait a few moments for the hypervisor to confirm that your machine has been created
Click the arrow next to your container's name to view possible operations and connection methods.
Your VM is created but powered off; you must start it.
A running VM consumes resources; if you are not using it, please shut it down
VM Operations✯
Starting the VM✯
Click the cyan button  to start the VM. Wait a few moments before accessing it
VM Snapshot✯
Click the blue button  to take a snapshot of the VM.
A form will open asking for the name you want to give your snapshot. You can create up to 5 different snapshots.
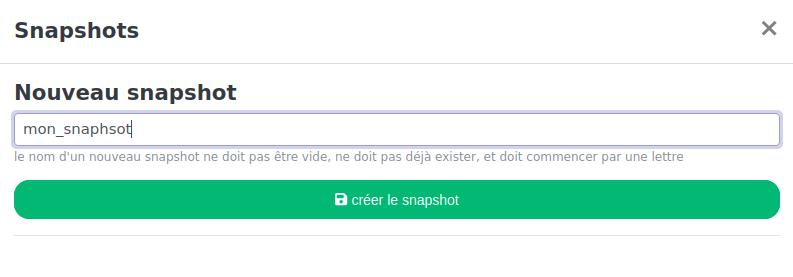
The VM must be running for the snapshot to be taken
Your screen will then display the snapshots you have created
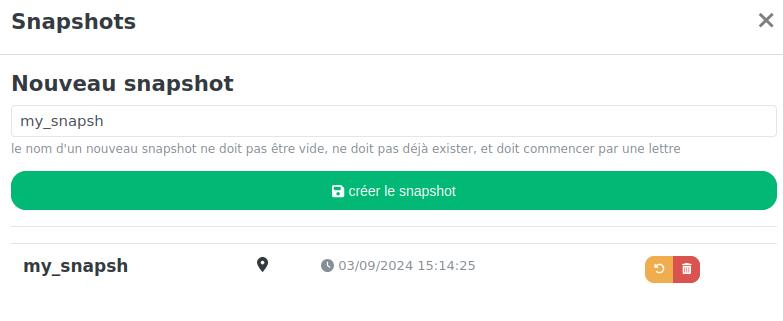
On this same screen:
- Click the yellow button to restore your VM from the snapshot (CAUTION: existing data will be overwritten)
- Click the red button to delete the snapshot
Shutting Down the VM✯
Click the yellow button  to shut down the VM.
Wait a few moments for it to take effect
Destroying the VM✯
Click the red button  to completely delete your VM.
Accessing the VM✯
When your VM is created, certain access methods are set up, including through the web interface of a remote connection bastion: Guacamole
SSH Access✯
If you are on the ISIMA network
Use Kerberos authentication with your UCA credentials
ssh <uca-account>@vm-<uca-account>.local.isima.fr
or ssh <uca-account>@srv-<uca-account>.local.isima.fr
If you are not on the ISIMA network
Enable the VPN and run your SSH command, then connect using your UCA credentials
ssh <uca-account>@vm-<uca-account>.local.isima.fr
or ssh <uca-account>@srv-<uca-account>.local.isima.fr
RDP Access✯
If you are on the ISIMA network
Use an RDP client compatible with your OS and connect using your UCA credentials
If you are not on the ISIMA network
Enable the VPN and launch your RDP client, then connect using your UCA credentials
The 'srv' type VM has no desktop and therefore cannot be accessed via this method
Via the Guacamole Web Interface✯
By logging in to Guacamole (using your UCA credentials), you can access your machine under the Virtual Machines tab
The 'srv' type VM has no desktop and therefore cannot be accessed via this method
Keyboard mapping may cause issues with Guacamole, particularly with certain shortcuts. For better graphical access, prefer RDP